Tentu saja, Anda dapat menggunakan teknologi AI untuk menulis blog. Ada beberapa platform seperti Copy.ai dan Articoolo yang memungkinkan Anda untuk menghasilkan konten blog dengan cepat menggunakan teknologi AI.
Namun, perlu diingat bahwa meskipun teknologi AI dapat membantu Anda dalam membuat bahan tulisan, Anda masih perlu meluangkan waktu untuk melakukan penelitian dan mengembangkan ide yang tepat untuk konten yang ingin Anda buat. Selain itu, Anda juga harus memeriksa kualitas konten yang dihasilkan oleh AI untuk memastikan bahwa konten tersebut sesuai dengan standar kualitas yang Anda inginkan.
Jadi, menggunakan teknologi AI untuk menulis blog dapat menjadi alat yang berguna dalam meningkatkan efisiensi dalam penulisan, tetapi perlu diimbangi dengan kualitas dan keaslian konten yang dihasilkan.
Ada beberapa cara yang dapat Anda lakukan untuk membuat tulisan blog menggunakan teknologi AI. Di bawah ini adalah beberapa langkah yang dapat Anda ikuti:
Pilih platform AI yang sesuai dengan kebutuhan Anda. Ada beberapa platform AI yang dapat digunakan untuk membuat konten blog, seperti Copy.ai dan Articoolo. Pastikan untuk memilih platform yang sesuai dengan kebutuhan Anda dan memiliki fitur yang Anda butuhkan.
Tentukan topik dan jenis konten yang ingin Anda buat. Sebelum memulai, pastikan untuk menentukan topik dan jenis konten yang ingin Anda buat. Ini akan membantu AI dalam membuat konten yang sesuai dengan kebutuhan Anda.
Masukkan instruksi dan keyword yang relevan. Platform AI biasanya membutuhkan instruksi dan keyword yang relevan untuk memahami apa yang ingin Anda tulis. Pastikan untuk memberikan instruksi yang jelas dan keyword yang tepat.
Tunggu AI menghasilkan konten. Setelah memberikan instruksi dan keyword, platform AI akan memproses informasi tersebut dan menghasilkan konten yang sesuai dengan kebutuhan Anda. Pastikan untuk memeriksa kualitas dan keaslian konten yang dihasilkan sebelum mempublikasikannya.
Edit dan revisi konten. Meskipun AI dapat membantu Anda dalam membuat konten, masih perlu dilakukan pengeditan dan revisi untuk memastikan bahwa konten tersebut sesuai dengan standar kualitas yang Anda inginkan. Pastikan untuk melakukan pengeditan dan revisi sebelum mempublikasikan konten tersebut.
Jadi, itulah beberapa cara untuk membuat tulisan blog menggunakan teknologi AI. Pastikan untuk memilih platform AI yang tepat, memberikan instruksi yang jelas, dan melakukan pengeditan dan revisi untuk memastikan kualitas konten yang baik.
Teruntuk Pengusaha Kena Pajak (PKP) yang telah memiliki Akun PKP ingin memperpanjang Sertifikat Elektronik yang sudah kedaluwarsa, namun memiliki mobilitas yang terbatas atau enggan bepergian di masa pandemi /PPKM dan lockdown sejenisnya, dapat mengajukan online melalui situs e-Nofa. Langkah awal Login akun PKP pada e-Nofa, lalu pilih menu Permintaan Sertifikat Digital. Silakan isi nama pemohon dan jabatan pemohon. Jika sudah, klik Proses. Nanti, Anda akan diminta untuk mengisi password e-nofa, lalu klik Proses.
Apabila proses permohonan berhasil, Anda akan mendapatkan notifikasi permintaan sertifikat digital sedang dalam proses persetujuan dari KPP. Notifikasi bisa dilihat pada menu Permintaan Sertifikat Digital. Pada menu tersebut, silakan untuk mencetak Surat Pernyataan. Setelah itu, print Surat Pernyataan tersebut dan mengisi data yang diminta. Jangan lupa untuk diberi meterai dan ditandatangani atau cap. Setelah itu, silakan scan surat pernyataan tersebut dan simpan file tersebut.
Wajib pajak juga diminta untuk menyiapkan password akun dan passphrase Pengusaha Kena Pajak (PKP). Siapkan juga dokumen seperti NPWP, nama dan alamat tempat tinggal, NIK, nomor telepon dan email terdaftar di DJP Online, dan EFIN. Langkah selanjutnya adalah mengirimkan dokumen persyaratan melalui email ke KPP tempat wajib pajak terdaftar. Keputusan disetujui atau tidaknya atas permohonan perpanjangan sertifikat biasanya disampaikan pada hari yang sama melalui e-mail. Bila disetujui, Anda juga akan mendapatkan notifikasi pada menu Permintaan Sertifikat Digital di e-Nofa Online. Selain itu, sertifikat elektronik terbaru juga bisa diunduh pada menu tersebut. Selesai.
Namun pengalaman saya setelah melakukan permintaaan sertifikat elektronik melalui e-nofa, maka kita harus mengirim email konfirmasi permohonan sertifikat elektronik data antara lain:
NPWP Badan :
Nama Badan :
Alamat Badan :
Nama direktur :
NIK direktur :
Nomor telepon direktur :
serta melampirkan swafoto direktur/komisaris memegang NPWP perusahaan dan KTP, scan KTP Direktur/Komisaris, dan Akta Perusahaan dengan format JPG, PNG atau PDF, lalu mengirim email tersebut ke email KPP sesuai lokasi perusahaan agan masing-masing
Dalam melakukan beberapa hal di perangkat Android, misalnya memasang custom recovery dan rooting, kadang-kadang Anda membutuhkan mode debugging dari perangkat android.
Mode ini sebenarnya adalah metode yang dipakai oleh programer atau pengembang perangkat lunak, untuk mencari error dari aplikasi yang dikembangkan, dengan menganalisis alur kerjanya.
Namun dengan kemampuannya tersebut, mode ini dapat dimanfaatkan oleh pemakai perangkat Android untuk mengakses beberapa hal di perangkat Android milik Anda melalui perangkat komputer atau laptop.
Di perangkat Android kamu bisa mengaktifkan mode ini, dengan mengaktifkan mode developer di perangkat yang kamu miliki. Di perangkat Xiaomi, Kalian dapat mengaktifkannya dengan cara berikut ini:
A. Cara Menggunakan Mode Developer Perangkat Xiaomi
1. Anda dapat membuka settings melalui perangkat Xiaomi yang Anda miliki.
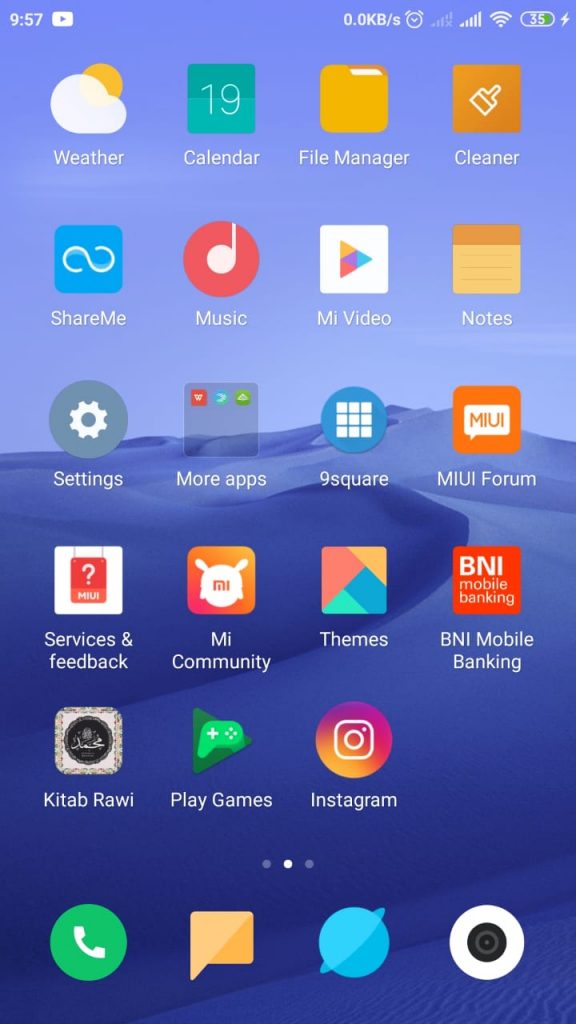
2. Setelah itu, gulir ke bawah dan pilih About Phone.
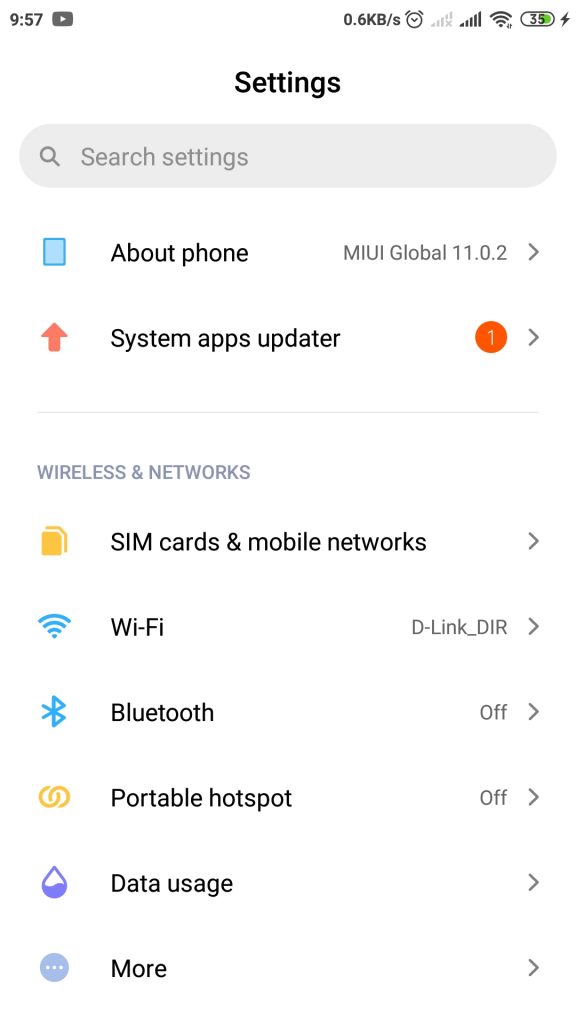
3. Lalu di halaman tersebut, kemudian ketuk MIUI Version berulang-ulang dengan selama 7 kali, sampai muncul tulisan yang mengindikasikan bahwa mode pengembang telah diaktifkan.
Ini adalah screenshot apabila sudah mengaktifkan developer
Apabila sudah sukses, Anda sekarang dapat mengaktifkan pilihan USB Debugging di perangkat Xiaomi yang akan kalian pakai. Untuk melakukannya kamu bisa membuka halaman developer yang telah diaktifkan. Secara lebih rinci Anda bisa mengikuti langkah-langkah berikut ini.
B. Cara Mengaktifkan USB Debugging di Pengaturan Developer Perangkat Xiaomi
1. Kalian bisa membuka pengaturan kembali.
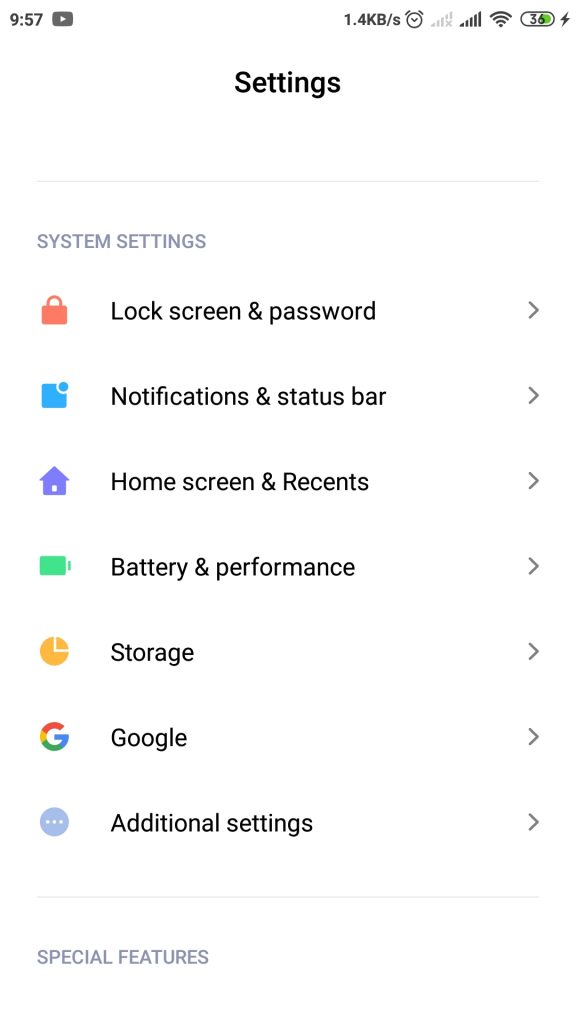
2. Setelah itu cari dan pilih opsi Additional Settings yang ditampilkan pada layar tersebut.
3. Selanjutnya, gulir ke bawah pada halaman Additional Settings, cari pilihan Developer Options.
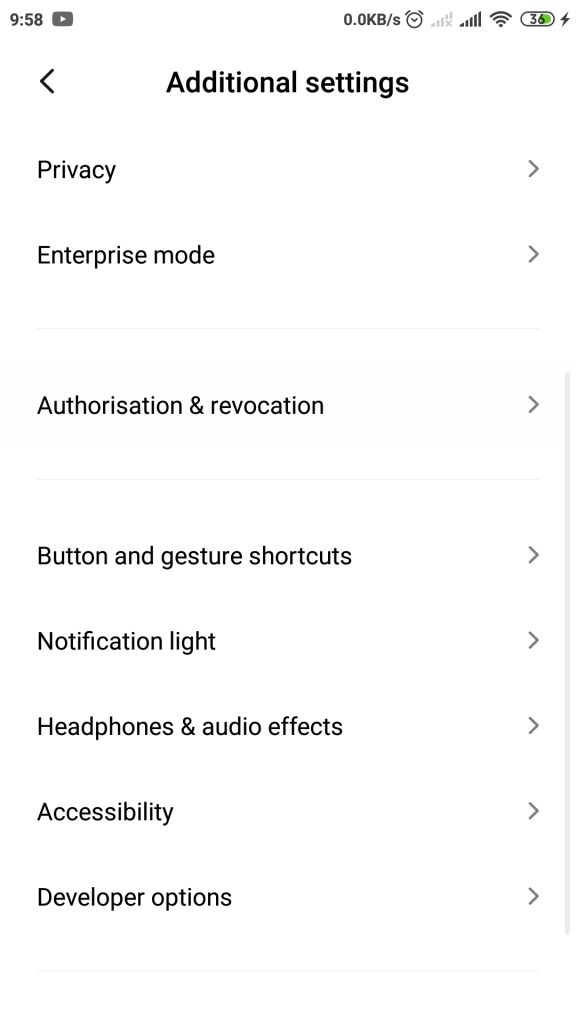
4. Apabila, jika pilihan developer tersebut belum tampil, berarti kalian harus mengulangi langkah-langkah cara mengaktifkannya di poin A.
5. Buka pilihan tersebut, kemudian cari dan tekan pilihan USB Debugging hingga tombol slider ke posisi hidup.
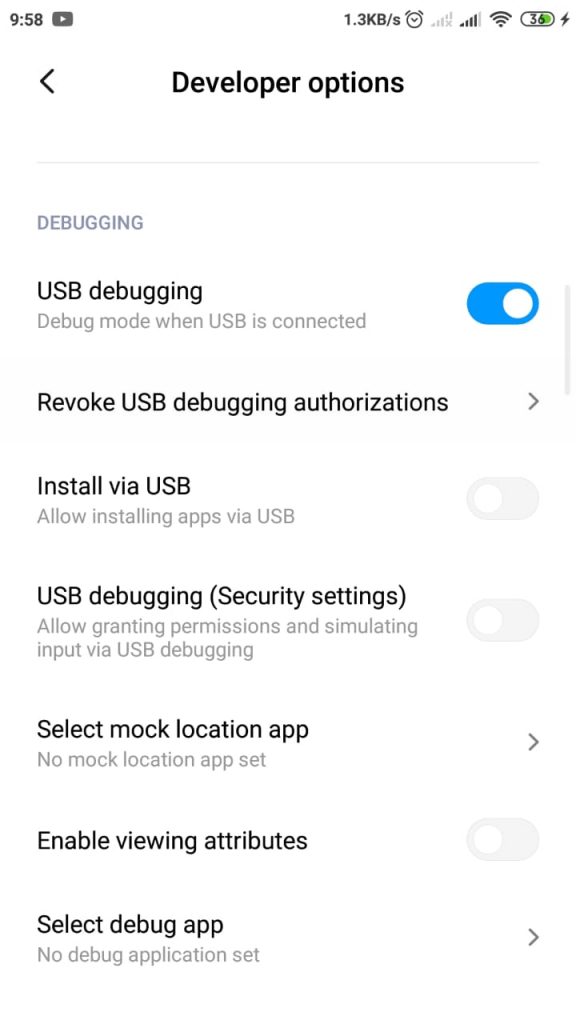
Jadi, dengan menyalakan opsi USB Debugging tersebut, perangkat Xiaomi yang kamu punya sekarang akan masuk ke mode debugging-nya secara otomatis setiap kali terhubung dengan perangkat komputer atau laptop.
Dan itulah dia artikel yang membahas mengenai bagaimana cara mengaktifkan usb debugging pada perangkat xiaomi.
How to running Apache, PHP, MySQL and phpMyAdmin for beginners (like me)
Apache Activation
Since apache and php are already pre-installed on macOS Sierra, we will activate them by using our Terminal. First type in the following:
sudo apachectl start
(For those who don’t know how to open terminal, you can open it by pressing cmd+Space and typing ‘Terminal’ in spotlight or by going to /Applications/Utilities folder)
To ensure that apache works correctly, you can type in your web browser ‘localhost’ (without quotation marks) and you should see an html file that says
It works!
If everything is ok, then go to Finder and at the top bar you should see ‘Go’ section. There, click on ‘Go to Folder…’ and type the following:
/Library/WebServer/Documents
In this folder, you will find all the files that are hosted by your web server. When you create or copy paste some kind of files here, you can access them by typing localhost/… on your web browser. Also, the index.html file is the file that you saw when you typed localhost on your web browser.
PHP Activation
As we activated apache, now we can go further and activate PHP. Again you should open terminal and type the following and then type in your password:
sudo nano /etc/apache2/httpd.conf
You can press Control+W to skip to the line that you are looking for.
This time we will encounter a page that is unlike our standard terminal page but more similar to a text editor. Here, we will uncomment the line which is related with the PHP by removing the ‘#’ at the beginning of it. You can press Control+W to skip to the line we are looking for (similar to cmd+f generally) and type
then press Enter. It should take you to the line that we would like to uncomment and activate. Or you can manually scroll down until you find the line that is written above. When you find that line, you should delete the “#” at the beginning and after that press Control+X to exit and you will be asked to save changes. Press Y, then press Enter and you will return back to terminal again.
By doing this, we activated our PHP that is pre-installed on MacOS Sierra. Let’s restart our web server by typing on terminal:
sudo apachectl restart
Now we want to change the default file which is displayed by our localhost. On your terminal, type again the following
sudo nano /etc/apache2/httpd.conf
Search for the code segment by manually scrolling down or pressing Control+X and then typing
DirectoryIndex index.html
You should see the following:
<IfModule dir_module>
DirectoryIndex index.html
</IfModule>
This is the default file that is displayed by our web server when we typed ‘localhost’ in the previous section. Now, we want our web server to run the file ‘index.php’. Therefore we will change the line:
DirectoryIndex index.html
to
DirectoryIndex index.php index.html
This means that ‘index.php’ file will be displayed when we type in ‘localhost’ on our web browser. Go back to terminal by pressing Control+X, then press Y and then press Enter.
Let’s restart our web server by typing on Terminal the following line in order our changes to take effect:
sudo apachectl restart
In the following section, you can encounter a problem about user restrictions. To nip it in the bud, in your finder, go to /Library/WebServer and right click on the ‘Documents’ folder and choose ‘Get Info’. At the bottom of the pop-up window, you will see a section ‘Sharing & Permissions’. Expand it and you will see a small lock symbol at the bottom right corner. Click on it and enter your password. Now you can change the privileges. Change every privilege from ‘Read only’ to ‘Read & Write’.
Everything looks perfect thus far except one last thing: We don’t have ‘index.php’ file. Lets create it by using any type of text editor. In text editor, type in the following:
<?php
echo “<title>Welcome to index.php file</title>”;
echo “<p>Hello! This is index.php file</p>”;
?>
Save it as ‘index.php’ in /Library/WebServer/Documents folder.
To ensure that it works correctly, type in ‘localhost’ in your web browser (don’t forget to delete cookies) and you should see something like this:
index.php file
If you can see a page like this, we can go further to install MySQL.
Installing MySQL
Before we start, you should download MySQL here. It will ask you to login but at the bottom of the page there is a link ‘No thanks, just start my download.’ Click on it and your download will start. After you download the file, we will begin installing by opening it.
VERY IMPORTANT NOTE: We will confirm everything that we are asked. After the installation has finished, a pop-up window will be displayed that gives you the temporary generated password for our MySQL. You MUST save it where you can reach easily. Because we will use it in our following configurations.
When your saving process has finished, you can close the window by clicking OK button and open Terminal again. In Terminal, type in:
sudo mkdir /var/mysql
and then:
sudo ln -s /tmp/mysql.sock /var/mysql/mysql.sock
This code will create a short link for our MySQL which will be needed for phpMyAdmin later.
To start MySQL Server, go to System Preferences on your mac, and you will see the MySQL symbol. Just click on it and there you will see the button Start MySQL Server. Click on that button and your MySQL Server has started.
To ensure that our MySQL Server is working properly, go to Terminal again and type the following:
cd /usr/local/mysql/bin
and then:
sudo /mysql -u root -p
The last code line will ask you for a password but this time we will use our temporary MySQL password that we saved previously during the installation. Just copy paste and press enter. You will see the following:
Welcome to the MySQL monitor. Commands end with ; or \g.
Your MySQL connection id is 2
Server version: 5.7.23 MySQL Community Server (GPL)
Oracle is a registered trademark of Oracle Corporation and/or its
affiliates. Other names may be trademarks of their respective
owners.
Type ‘help;’ or ‘\h’ for help. Type ‘\c’ to clear the current input statement.
mysql>
If everything is ok thus far, we will change the administrator password to an optional one. While you are still in MySQL, type the following:
ALTER USER ‘root’@’localhost’ IDENTIFIED BY ‘password’;
Here, you will replace the ‘password’ to whatever you would like to use in the future. (do not delete quotation marks)
If we are done with it, we will exit MySQL by typing:
exit;
and hit the Enter button. Finally we can start installing phpMyadmin.
Installing phpMyAdmin
In order to install phpMyAdmin, you should first download it here. At the bottom of the page, you will see the file named ‘phpMyAdmin-4.6.6-english.zip’. Just click on it and your download will start. Once it has been downloaded, we will simply drag it on your /Library/WebServer/Documents folder. In that folder, we must unzip the file and delete the original .zip one. After that, we will rename that folder from ‘phpMyAdmin-4.6.6-english’ to only ‘phpMyAdmin’.
After we are done with that, let’s go back to our Terminal and type in the following:
cd /Library/WebServer/Documents/
and then
cd phpMyadmin
By doing this, we will change our directory to the folder that we’ve just renamed. Now let’s create a config folder by typing the following:
sudo mkdir config
and give it some rights by typing:
sudo chmod o+x config
Now we can head in to our web browser and type the following in order to setup phpMyAdmin:
localhost/phpmyadmin/setup/
Here we see the setup page and let’s hit the ‘ New Server’ button. We should go to the ‘Authentication’ tab and fill the ‘Password for config auth’ section with our new password that we’ve created by typing “ALTER USER root…..”
Later on, we will click on ‘Apply’ button and then we will click on ‘Download’. Your web browser will download a file that is named ‘config.inc.php’. Just drag it on the /Library/WebServer/Documents/phpMyAdmin folder and we are done with that.
Now we can go to
localhost/phpmyadmin
on our web browser and login with the username ‘root’ and the password that you’ve chosen before.
Finally we have a fully operational WebServer with Apache, PHP, MySQL and phpMyAdmin. I hope everything went well and see you on my future posts!
Original Article : https://medium.com/@ozgenbaris/how-to-run-apache-php-mysql-and-phpmyadmin-on-macos-sierra-3d2df5fce2e4